Homemade Marshmallows made with Gut Healing Ingredients (no refined-sugar)

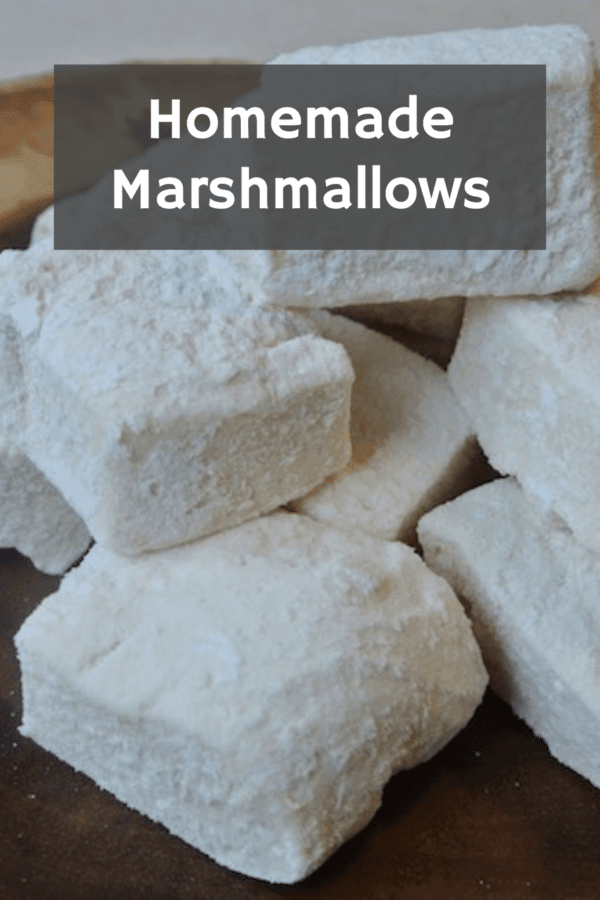
These homemade marshmallows have collagen rich grass-fed gelatin and contain a decoction of marshmallow root. Both are healing to the gut lining. They use maple syrup and honey instead of corn syrup or refined sugar. They are still a treat, however, and I recommend just having one if you can stop yourself. Best made and taken to a party or campfire to share!

To make homemade marshmallows you will need:

  • 1 1/4 cup water
  • organic chopped marshmallow root
  • 4 tablespoons grass-fed gelatin
  • 1/2 cup raw organic honey
  • 1/2 cup organic maple syrup
  • 1 teaspoon vanilla
  • 1/4 teaspoon sea salt
  • coconut oil (avocado)
  • Arrowroot or organic cornstarch
  • Candy thermometer
  • Parchment Paper


Directions:

  1. First, add your marshmallow root and your water to a medium saucepan. Bring to a boil and then turn off the heat. Once the mixture has cooled to room temperature, strain out the marshmallow root.
  2. Next, add your gelatin to the bowl of your stand mixer with 1/2 cup of the marshmallow root water. This will allow the gelatin to soften.
  3. Next, add the honey, maple syrup, and 1/2 cup of the marshmallow root water to the medium-sized sauce pan you used before (be sure to rinse it out first.)(You may have some water leftover. Just drink or discard.) Make sure your pan is not too small or your mixture may boil over. It is a horrible mess to clean up! I am unfortunately speaking from experience here. Also, don’t use a large pan or your mixture may get too hot too quickly and burn. No fun!
  4. Bring the mixture to a boil over medium heat until it reaches 235-240 degrees, no higher.
  5. Next, turn on the stand mixer on low to mix soften gelatin. Very slowly add the honey/syrup mixture.
  6. Once all the honey/syrup mixture is added, turn your mixer on high. Once it is almost cool, usually about 7 minutes, add your vanilla. Mix for 1-3 more minutes.
  7. Spoon the mixture into a pan lined with parchment paper, greased with either coconut oil or avocado oil, and lightly dusted with either arrowroot powder or organic cornstarch. Choose the pan size for the shape marshmallow you like. The bigger the pan, the shallower the marshmallow. For a square marshmallow, choose and 8 x 8 pan.
  8. Smooth the top of your marshmallow mixture with your spatula. If it is not smooth emough, you can grease your hands and pat it down.
  9. Let your marshmallows set overnight. (You don’t have to do this, but they will cut much easier.)
  10. After your marshmallows have set up, use the parchment to life them out of the pan.
  11. Cut with a well-greased serrated knife or pizza cutter.
  12. Dust marshmallows with arrowroot powder or organic cornstarch (the only way to get cornstarch that is not GMO is to buy organic cornstarch.)
  13. These roast better after they have set out a bit. I set mine on racks for most of the day before moving them to an airtight container and storing in the fridge.

Homemade Marshmallows made with Gut Healing Ingredients

Chelsea
Prep Time 40 minutes

Ingredients
  

  • 1 1/4 cup water
  • Organic Chopped Marshmallow Root
  • 3 tablespoons grass-fed gelatin
  • 1/2 cup raw organic honey
  • 1/2 cup organic maple syrup
  • 1 teaspoon vanilla
  • 1/4 teaspoon sea salt
  • coconut oil avocado
  • Arrowroot or organic cornstarch
  • Candy thermometer
  • Parchment Paper

Instructions
 

  • First, add your marshmallow root and your water to a medium saucepan. Bring to a boil and then turn off the heat. Once the mixture has cooled to room temperature, strain out the marshmallow root.
  • Next, add your gelatin to the bowl of your stand mixer with 1/2 cup of the marshmallow root water. This will allow the gelatin to soften.
  • Next, add the honey, maple syrup, and 1/2 cup of the marshmallow root water to the medium-sized sauce pan you used before (be sure to rinse it out first.)(You may have some water leftover. Just drink or discard.) Make sure your pan is not too small or your mixture may boil over. It is a horrible mess to clean up! I am unfortunately speaking from experience here. Also, don't use a large pan or your mixture may get too hot too quickly and burn. No fun!
  • Bring the mixture to a boil over medium heat until it reaches 240-242 degrees, no higher.
  • Next, turn on the stand mixer on low to mix soften gelatin. Very slowly add the honey/syrup mixture.
  • Once all the honey/syrup mixture is added, turn your mixer on high. Once it is almost cool, usually about 7 minutes, add your vanilla. Mix for 1-3 more minutes.
  • Spoon the mixture into a pan lined with parchment paper, greased with either coconut oil or avocado oil, and lightly dusted with either arrowroot powder or organic cornstarch. Choose the pan size for the shape marshmallow you like. The bigger the pan, the shallower the marshmallow. For a square marshmallow, choose and 8 x 8 pan.
  • Smooth the top of your marshmallow mixture with your spatula. If it is not smooth emough, you can grease your hands and pat it down.
  • Let your marshmallows set overnight. (You don't have to do this, but they will cut much easier.)
  • After your marshmallows have set up, use the parchment to life them out of the pan.
  • Cut with a well-greased serrated knife or pizza cutter.
  • Dust marshmallows with arrowroot powder or organic cornstarch (the only way to get cornstarch that is not GMO is to buy organic cornstarch.)
  • These roast better after they have set out a bit. I set mine on racks for most of the day before moving them to an airtight container.
Tried this recipe?Let us know how it was!

Keep in touch!

We love pinning on Pinterest!


However, our favorite way to keep in touch is through email! Subscribe and never miss a post. Plus, get access to the Holistic Health Resource Library. There you can download ebooks, PDFs, and Homeopathic Remedy Cards by condition for FREE!

You will also get emails with information on how to incorporate true holistic healing into your life. Absolutely no spam!

chelsea

View Comments

  • Oooh, I like the thought of adding maple and honey - yum! I love homemade marshmallows - they're probably my favorite kitchen DIY. They're just so cool and store bought are so nasty. This is a great base recipe - wonderful!

  • I've never attempted homemade marshmallows... though I do have a special place in my heart for all things marshmallow!

  • Oh, yum! My girls love marshmallows, but I hate pumping them full of processed sugar. I am pinning this to try out at home with them. We love a fun kitchen day!

Recent Posts

Homeopathic Remedies for Headaches and Migraines

We are back to addressing symptoms of the sickness season with Homeopathic remedies for headaches…

5 months ago

Homeopathy for Overindulgence

With Homeopathy for Overindulgence, we are briefly departing from our "sickness" symptoms series. However, since…

6 months ago

Homeopathy for Vomiting

Homeopathy for vomiting will be our topic this week. This series covers all the possible…

6 months ago

Homeopathy for Diarrhea

This week we will learn how to use Homeopathy for Diarrhea. We touched on gastro…

6 months ago

Homeopathy for Post-Viral Fatigue

In this post, we will discuss how to use Homeopathy for post-viral fatigue. If you…

7 months ago

Homeopathy for Coughs

Last week we covered Homeopathy for Sore Throats. This week we will continue the theme…

7 months ago

This website uses cookies.