This Parsnip Poutine is a simple, comforting dish full of healthy fats! Throw some pulled pork or shredded chicken on top and add a green salad or veggies on the side for a complete meal. So simple! Although this recipe is named Parsnip Poutine, you can make this with almost any root vegetable! It works well with celeriac, kohlrabi, and even turnips. My favorite way to make it is to mix parsnips, celeriac, and kohlrabi.
What is Poutine?
Do you know what a poutine is? If not, let me introduce you to an amazingly comforting dish! Poutine is a Canadian dish from Quebec. It traditionally consists of potato fries covered in brown gravy and cheese curds. My version uses root vegetables other than potatoes, although you can certainly use potatoes! I top it with some homemade bone broth gravy and grass-fed cheese curds.
How to make Parsnip Poutine:
For the parsnip fries:
- Several large parsnips (or kohlrabi or celeraic or a mixture)
- Garlic salt (equal parts sea salt with garlic powder)
- Avocado oil for tossing
- Wash your parsnips (or other root veggie) and cut them in strips like french fries. I like to pick out big parsnips for this because it is easier to make them into strips. Don’t peel your parsnips! A lot of the nutrition is just under the skin and you don’t want to peel it away!
- Toss your parsnips generously in avocado oil or coconut oil. I prefer the taste of avocado oil for this dish. Please don’t use any vegetable or seed oils such as canola, corn, sunflower, etc! They are extremely detrimental to your health! Throw them out of you kitchen asap!
- Sprinkle garlic salt on top of your “fries” and give the bowl a good mix. Garlic salt is equal parts garlic powder with equal parts fine sea salt. Please don’t use iodized table salt! This is also detrimental to your health. Throw it out and buy some quality sea salt. 🙂
- Roast your root vegetable fries at 375 degrees for about 20-30 minutes. Give them a stir every now and then to share the browning love and to prevent some of them from burning. Once they are done, you can take them out of the oven, but leave the oven on.
For the gravy:
While the fries are roasting, you can make your gravy. First, you must start with good broth/stock to make a good gravy. Please don’t buy a packet of gravy from the store! I bet you know where I am going with this. They are detrimental to your health! See my post “Do you have harmful spices in your cupboard?” for more information if you are curious.
I us my own homemade bone broth, which is so easy to make and you can do it for practically free! If you are not the home-broth-making type (yet, in the interest of full disclosure, I have to confess that I have ulterior motive of converting you), make sure you buy a broth from grass-fed animals such as Kettle and Fire broth. It’s pricier than your average box of stock, but there is a reason for it! It is made from pastured animals to avoid the toxins in the bones and meats of conventionally raised animals. It is also long-simmered to get the maximum nutrients and collagen.
To make a traditional gravy (gluten-free):
- Make a roux. This is equal parts butter and flour. Now, as with all foods, quality counts here. Use grass-fed butter and organic superfine rice flour.
- Melt the butter over medium heat. Once melted, add your flour. Continually stir for a few minutes. It will form a sort of paste.
- Next, add your stock. I like to do this slowly at first.
- Finally, let your gravy thicken, stirring occasionally.
- Set aside.
To make a gluten-free gravy:
- Homemade bone broth or Kettle and Fire (chicken, beef, etc)
- Organic cornstarch or arrowroot powder
- Sea salt to taste
- Thicken your broth with either organic corn starch (if it isn’t organic it’s GMO) or with arrowroot powder if you have a corn sensitivity.
- To do this, heat your broth first.
- Once it comes to a boil, add your cornstarch or arrowroot and then let it boil for another minute or two.
- Set aside.
Cheese Curds:
You can either buy or make your own cheese curds. I have never made them, but it is on my to-do list. I think I will use either this post: “Quick and Easy Homemade Cheese from Musings of a Modern Hippie (this one makes cottage cheese, too!) or this post: “Fresh Cheese Curds” from the Glass Pantry when I am ready for this adventure. For now though, I am able to find yummy grass-fed cheese curds at my local co-op.
Assemble your Parsnip Poutine:
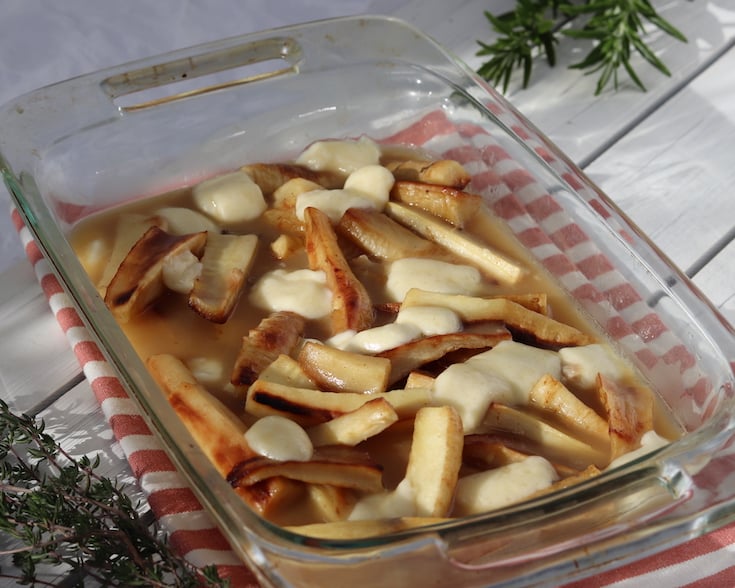
Add your parsnip fries to a baking dish. Top with cheese curds and gravy and pop back into the oven for 5-10 minutes. The proportions are totally up to you. There is no wrong way to combine these delicious ingredients!! I personally love it drowning in gravy, with fewer cheese curds, but traditionally it isn’t swimming in gravy and there are a lot of cheese curds. Adding shredded chicken, pork, or beef will make it a meal. (If you have something green on the side, of course 🙂
Parsnip Poutine
Chelsea
A comforting and nutritious dish that is simple and delicious.
Cook Time 30 minutes mins
Total Time 40 minutes mins
- For "Fries"
- Several large parsnips or kohlrabi or celeraic or a mixture
- Garlic salt equal parts sea salt with garlic powder
- Avocado oil for tossing
For traditional gravy
- grass-fed butter
- Einkhorn all-purpose flour
- Homemade bone broth or Kettle and Fire
- Sea salt to taste
For Gluten-free gravy
- Homemade bone broth or Kettle and Fire
- Organic cornstarch or arrowroot powder
- Sea salt to taste
FOR THE PARSNIP FRIES
Wash your parsnips (or other root veggie) and cut them in strips like french fries. I like to pick out big parsnips for this because it is easier to make them into strips. Don't peel your parsnips! A lot of the nutrition is just under the skin and you don't want to peel it away!
Toss your parsnips generously in avocado oil or coconut oil. I prefer the taste of avocado oil for this dish. Please don't use any vegetable or seed oils such as canola, corn, sunflower, etc! They are extremely detrimental to your health! Throw them out of you kitchen asap!
Sprinkle garlic salt on top of your "fries" and give the bowl a good mix. Garlic salt is equal parts garlic powder with equal parts fine sea salt. Please don't use iodized table salt! This is also detrimental to your health. Throw it out and buy some quality sea salt. 🙂
Roast your root vegetable fries at 375 degrees for about 20-30 minutes. Give them a stir every now and then to share the browning love and to prevent some of them from burning. Once they are done, you can take them out of the oven, but leave the oven on.
FOR THE GRAVY
While the fries are roasting, you can make your gravy. First, you must start with good broth/stock to make a good gravy. Please don't buy a packet of gravy from the store! I bet you know where I am going with this. They are detrimental to your health! See my post "Do you have harmful spices in your cupboard?" for more information if you are curious.
I us my own homemade bone broth, which is so easy to make and you can do it for practically free! If you are not the home-broth-making type (yet, in the interest of full disclosure, I have to confess that I have ulterior motive of converting you), make sure you buy a broth from grass-fed animals such as Kettle and Fire. It's pricier than your average box of stock, but there is a reason for it! It is made from pastured animals to avoid the toxins in the bones and meats of conventionally raised animals. It is also long-simmered to get the maximum nutrients and collagen.
To make a traditional gravy
Make a roux. This is equal parts butter and flour. Now, as with all foods, quality counts here. Use grass-fed butter and unbleached, unbromated, and unenriched flour. I personally only use Einkhorn anymore when it comes to wheat. I grind my own Einkhorn wheat berries in my Mock Mill, or I buy Jovial organic all-purpose einkhorn flour.
Melt the butter over medium heat. Once melted, add your flour. Continually stir for a few minutes. It will form a sort of paste.
Next, add your stock. I like to do this slowly at first.
Let your gravy thicken, stirring occasionally.
Set aside.
To make a gluten-free gravy
Thicken your broth with either organic corn starch (if it isn't organic it's GMO) or with arrowroot powder if you have a corn sensitivity.
To do this, heat your broth first.
Once it comes to a boil, add your cornstarch or arrowroot and then let it boil for another minute or two.
Set aside.
To assemble your Parsnip Poutine
Add your parsnip fries to a baking dish. Top with cheese curds and gravy and pop it back into the oven for 5-10 minutes. The proportions are totally up to you. There is no wrong way to combine these delicious ingredients!! I personally love it drowning in gravy, with fewer cheese curds, but traditionally it isn't swimming in gravy and there are a lot of cheese curds.
Top with shredded pork, chicken, or beef to make it a meal. Don't forget a green salad or green veggie on the side, of course!
Let me know if you try this recipe and which root veggies were your favorite!
View Comments
I'll try this this week! Thanks for making a carb-friendly version. I love potatoes but too many just tears up my stomach.
I love delicious dishes with hidden veggies that kids can enjoy while eating healthy. And this is one of them. It's on my list now as I found your ingredients very healthy and also perfect for the winter.
Omg this sounds SO YUMMY!! And my husband would LOVE this!!
Why is sunflower oil bad?? I just bought a bottle! I chose it because it has a high smoke point and my oil always ends up smoking when I'm preheating my cast iron.
Hi Emily,
If your sunflower oil says that it has a high smoke point, it is mostly likely refined instead of cold-pressed. It is best to choose oils that are unrefined with the least amount of processing possible because they are fragile. The high heat process they use to refine oils actually causes the fats to go rancid. This is very taxing on your body! If that weren't enough, they then use chemicals to cover up the rancid smell. If you do want to use sunflower oil, you should choose cold processed, high-oleic, unrefined sunflower oil and only use it for salad dressings or to drizzle on a finished dish. You would also want to use it up quickly and/or refrigerate it. Keep in mind, however, that this oil is very high in omega 6s as is the Standard American Diet. Most of us need to be trying to balance our omega 6 consumption with omega 3s (like in olive oil, avocado oil, fish, grass-fed dairy, etc.) If you need to fry something, lard and tallow are the safest. They are saturated fats and are therefore stable at high heat. Avocado oil is good for oven dishes like roasted veggies and for a stove-top saute. If you have true extra virgin olive oil, it can be used the same way as avocado oil, but apparently the majority of olive oils sold are adulterated. Such a bummer! I hope this answers your question. Let me know if you have any more! :)
Chelsea
I have been on a hunt for healthier recipes. One of my favorite things of all time to eat is cheese curds. I will try this recipe and let you know what I think. Thanks for telling us what a poutine is!
So yummy! I'll always remember the first time I had poutine when we visited Montreal. So much cheesy goodness that I couldn't stop eating. Thanks for sharing, the kids are going to be very happy this weekend.